Once you have clicked Create or Continue CMA, the CMA Builder will launch. If you are continuing a CMA, your previous selections will appear for you to edit. If you are creating a new CMA then you will see the view below, which will allow you to begin selecting comparable properties for inclusion within your CMA. The process will start with comparing properties that have been sold recently (the default Last Sale Date is 6 months, and 2 km radius).

The property you are creating the CMA for will remain on the left-hand side of the page while you build your CMA. The filters let you select the attributes that best match your subject property and create a list of comparable properties. Please select at least one filter to proceed. You can Clear your selections if you need to start again.

Once you click Apply, results will be returned based on the filters you select.

Depending on how many results have appeared, you may want to refine your search further or widen the parameters you have used. You can bring the filters screen back at any time by clicking the All Filters button in the top-right.
Your results appear in a card view, which allows easy comparison with the subject property. The number of cards presented will depend on the width of your screen.
You can navigate to new cards by scrolling down the page, as with the search results, you can return to the top of the page by clicking the up arrow.
Above the cards you will see the total number of properties that have been returned with the filters you have used, as well as the Selected Properties that have been selected as being comparable to the subject property and worth including in your CMA.

If you know that certain physical property attributes are incorrect for your subject property, for instance, the number of bedrooms is wrong, then you can edit this while building your CMA.

The edits will only appear in the published CMA and a message will be added to the CMA to state that these details have been edited.

To select a property for inclusion in your CMA, hover over and click the Select button for that card. The property will be added to the Selected Properties tab.

To add a comment to a property select the orange button and you will see a box appear for you to add your commentary.

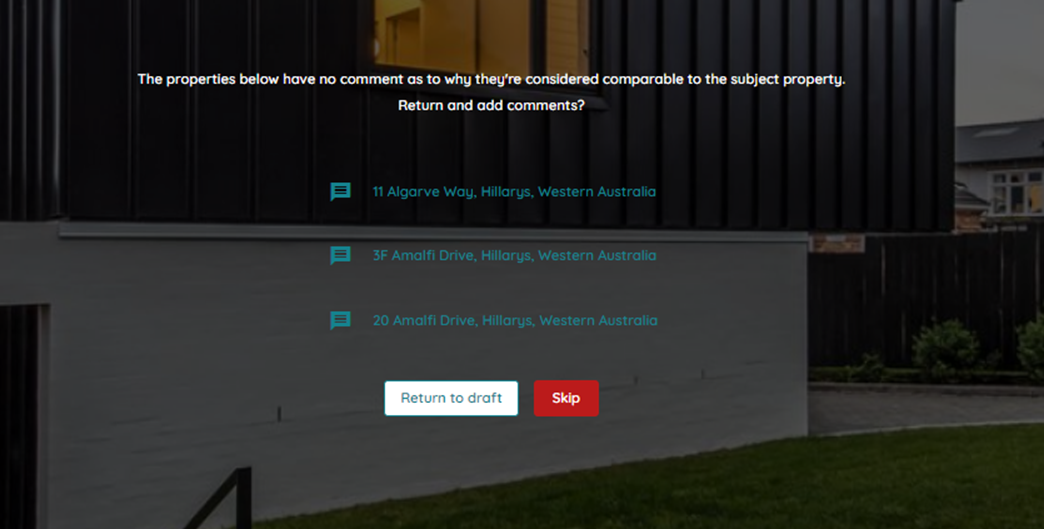
If you forget or choose not to add a comment before moving on to the next step in the build process, a message will appear listing which properties do not have comments and directing you to Return to draft to add commentary. You can skip this step if you do not wish to add any comments.
Type your comment in the box and click Save.
If you have clicked Skip and returned to add a comment, click on the orange comment icon and the box will reappear.

Once you click save the icon will change to green. The comment you have left will be added to your finalised CMA on the page for that comparable property. If you need to edit your comment, click on the green comment icon and the box will reappear for you to make changes.
If you no longer want the property to be included in your CMA, hover over the Selected button and it will change to allow you to Deselect the property.

The image at the top of each property card shows what will be included by default as the image for the property in your final CMA.
If you would prefer to have a different image displayed in the CMA, you can upload an image that will replace our default aerial or map image by clicking the icon in the top right of the image. You can do this for the subject property and any property you selected for inclusion in your CMA.

You can then crop the image to the required resolution and upload it. The new image will now show in your final saved CMA.

If the property has more than one image available to view, a number will appear in the bottom right of the image. To view the image, click anywhere on the image card. The catalogue of images will be available to view by clicking on the arrows, or by selecting an image from the bottom of the page. Any image from the catalogue can be selected as the main image by clicking Set as Main.

You can now either click the Next button in the bottom right, or the heading at the top of the screen to move to select Properties on the market.
In this section, we will only display active listing properties. The default Last Sale Date is 6 months, and 2 km radius.

Follow the same process as above to select properties, add comments, and upload images.
If you do not want to include any currently listed properties in your CMA, then you can move straight to finishing your CMA by clicking on “Customise CMA” in the top-right of your screen.
Before your CMA is complete, we need to know who it is being prepared for and what the appraisal range is. The Customise CMA screen allows you to:
- Choose a File name for your CMA. The default name is the address of the subject property and the current date. This can be changed to a maximum of 100 characters.
- Add the vendor or vendors that the CMA is being Prepared for
- Add the Agent name that the CMA is being Prepared by
- Add the Price range for the property, or select Leave Blank to remove the need to add a range
- Select the Template
- Select the Pages to include in the CMA. Any greyed-out sections are mandatory and must be included. These will conform to the instructions we have received when uploading your template.
- Preview the CMA before downloading the completed CMA pdf

Clicking Preview will take you to a new webpage where the generated pdf can be viewed, under the filename you selected. You will be able to review the full pdf to ensure all the data you have added during the build process has been captured correctly.

If you do not see the pdf open in a new window in your browser, it will likely be due to a setting in your browser which blocks pop-ups. You can change this setting for Valocity Nexus only to allow the pdf window to open.


Click Finalise to complete your CMA. You will be returned to the property landing page for the CMA subject property and you will be able to see your completed CMA in the Appraisals section.
